
6. The initial setup, step by step
The first time, the dashboard guides you through five steps: Business, Location, Tour, 360° photos and Publish. At the end you have a link to share. Your progress is saved as you go.
- On the Overview, press Start setup on the Get your first tour online card. You can also press Finish setup in the sidebar.
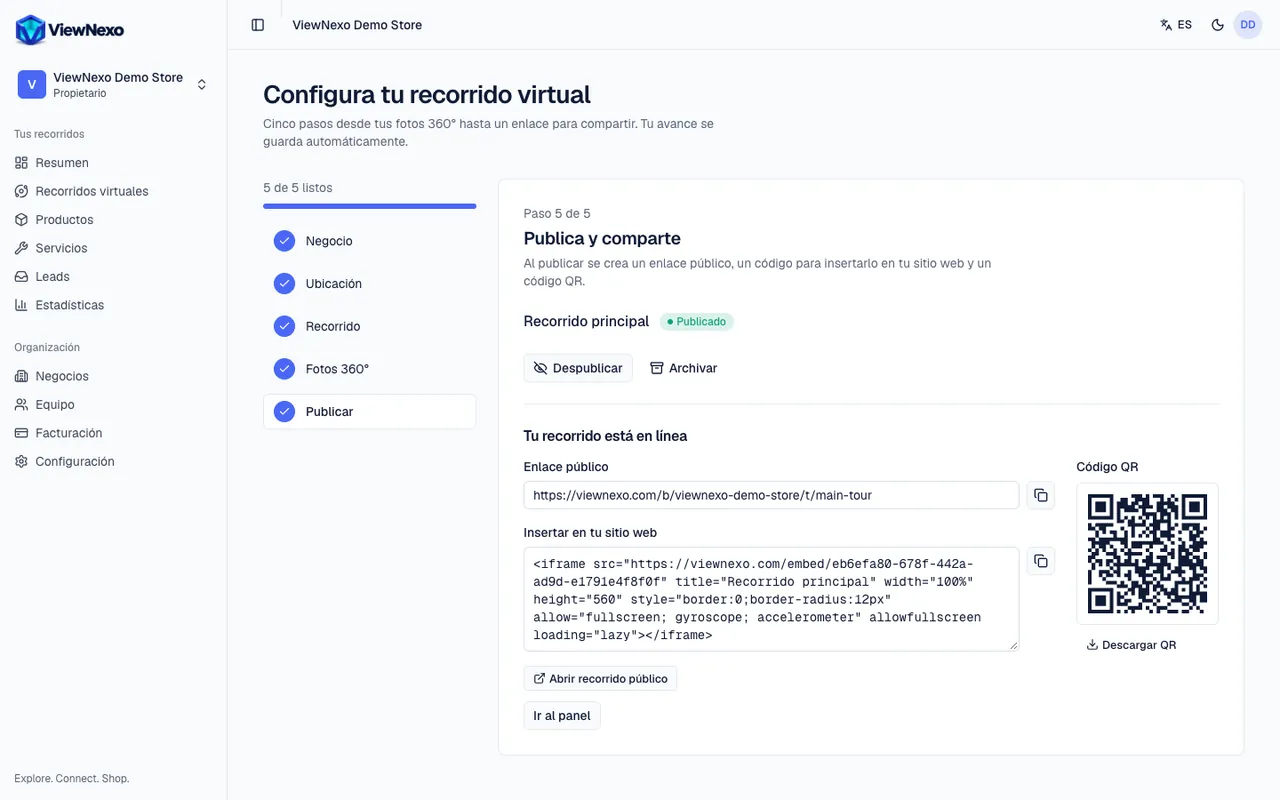
- On the left (at the top on a phone) you see the five steps and how many are done. Finished steps have a ✓ mark; the current one is highlighted. A step opens only once the previous ones are done.
- On the right is the current step: it says Step 1 of 5, the title and a short explanation. Fill it in and press the blue button to move on.
Step 1: Business
It is titled Tell us about your business. Visitors see these details inside the tour. Only the name is required; you can complete the rest later.
- Fill in the fields and press Save and continue, at the end of the form (scroll down if you do not see it).
- The step shows your business and two boxes: Logo and Cover image. Press Upload on each and choose the picture on your computer or phone. It is optional, but your tour looks much better with your logo.
- Press Continue. To fix something, Edit details opens the business's full page.
- Business name: the name your customers know, for example Nova Electronics.
- Category: press Choose a category and pick your sector (restaurant, hotel, dealership, gym, shop…).
- Description: what you sell or offer, in one or two sentences.
- Sample content: when you choose the category, a note says Sample categories and services for your sector will be created, with the Create sample content switch. Leave it on for a head start; you edit or delete them later under Products and Services. Turn it off to start from a blank page.
- Address: Country, City and Street address. Contact: Phone, WhatsApp (with the country code, see chapter 7), Email, Website, Instagram, Facebook and TikTok.
- Preferences: the Currency of your prices and the Tour language, the language visitors see when they open the tour.
Step 2: Location
Add your location: the physical place where the photos were taken. If you have several branches, one per place.
- Fill in the details and press Add location.
- You will see the location in a list. Press Add another location if you have more branches, or Continue.
- Location name (required): for example Downtown store.
- Country, City, Street address and Phone.
- Latitude and Longitude: optional; leave them empty if you do not know them.
- Main location: a switch so it is shown first on your business page.
Step 3: Tour
Create your tour. You can create more later, for example one per floor or per branch.
- Press Create tour and then Continue.
- Tour name: for example Main store.
- Link name: the last part of the public address. It fills in by itself from the name; if you change it, use only lowercase letters, numbers and hyphens. Below it you see the result: Public link: /b/your-business/t/main-store.
- Location: choose the one from the previous step (or No specific location).
- Description: optional.
Step 4: 360° photos
Upload your 360° photos. Each photo becomes a scene. If you do not have them yet, take them with the ViewNexo 360 app (chapter 8): they will show up here by themselves.
- Press Choose 360° photos and select your photos (you can pick several at once), or drag them from a folder and drop them on the Drop your 360° photos here box.
- Each photo shows its progress while it uploads and is processed. Wait until its picture appears.
- Once there are scenes, See how it looks and Open editor appear. The editor is where you connect scenes with arrows and add points (chapters 10 and 11); you can do it now or later.
- Press Continue. It becomes active as soon as at least one photo has finished processing.
Step 5: Publish
Publish and share. Until now the tour is a draft only you can see.
- Press Publish. If a photo is still processing, the tour shows Processing and goes live by itself when it finishes.
- Your tour is live appears with the sharing block: the Public link with a button to copy it, the code to Embed on your website, Open public tour and the QR code with Download QR (chapter 24).
- Press Go to dashboard to return to the Overview.
Only managers and owners can publish. If you are an editor, ask one of them to do it.
Leaving and coming back
You can close the browser at any step: what you saved is not lost. When you come back, the Get your first tour online card on the Overview shows how many steps are done; press Continue and it takes you straight to the pending step. The card disappears once all five are done.